Home » PythonPi Introductory Course
Category Archives: PythonPi Introductory Course
Python Pi: Lesson 8
So you’ve finally learned the basics of Python using your RaspberryPi and now we are going to put your skills into use by making an actual game!
Using everything you have learned thus far you must create a text based roleplaying game in which you are to escape a haunted house. You will begin with five lives, every time you lose a life you will have to try again. After you’ve lost five lives the game will automatically exit, leaving the player to have to start again.
The Script:
note that this script is case sensitive, if you don’t follow the case, you will not receive the marks. Maybe copy and paste for printing.
1: You have 5 lives
2: You awake in a dark room. you cant see anything. what do you do?
3: -IF USER SAYS- “turn on light” – Then – “The Room Lights Up” – ELSE – “Lose a life”
4: There seems to be a bag of sweets in the corner
5: -IF USER SAYS- “open sweets” – Then – “The bag contains:”
6: [“sherbet lemon”, “refresher”, “drumstick”] – ELSE – “Lose a life” – HINT: Store sweets in list
7: Hmmm these look tasty what to do with these sweets?
8: -IF USER SAYS- “put down” – Then – “Avoided poisonous sweets!” – ELSE – ‘Lose a life’
9: There is a door in the corner of the room…
10: -IF USER SAYS- “open door” – Then – “The door opened, revealing a dark staircase, a light switch is to the side” – ELSE – “The walls closed in on you”
11: “I don’t think those stairs look safe…”
12: -IF USER SAYS- “turn on light” – Then – “The staircase lit up, revealing the passage to downstairs” – ELSE -‘The darkness caught you!’
13: “Let’s get out of here!”
14: -IF USER SAYS- “go downstairs” – Then – “The door is in sight, a ghost is following you!” – ELSE – ‘The ghosts grab you!’
15: Quick!
16: -IF USER SAYS- ‘run’ – Then – “You made it out of the ghost house, congratulations!” – ELSE – ‘The ghosts grab you!’
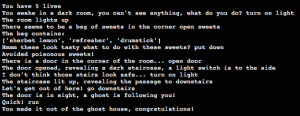
The correct output, if you have made the game correctly and win without losing any lives should look as follows:
Tips:
- Write a function that will check whether you have more than 1 life, if you don’t, you should exit using sys.exit() for this to work you will have to write import sys at the top of your code.
- Make two global variables, one for the number of lives, perhaps lives = 0 will do. Then another to check whether the user can continue, cont = 0 perhaps.
- For each loop that is in this program there will be a while loop that checks whether continue is the same as the previous setting, for example the first loop will run whilst cont = 0, the second loop whilst cont = 1. If the user gives the correct input, it will add one to cont. If a user gives a wrong answer, they will lose a life and cont will remain the same, thus given them another chance to play.
- Make sure you have the function that checks whether someone has enough lives to continue is at the top. You will be calling it from there each time and as we learned in the logic lecture, programs run in the order they written.
- If you are really struggling, there is a sample in the class room section of a similar game!
PythonPi: Lesson Seven
Today we will be learning about lists and defining function. This will allow us to build up to the final piece of coursework in lesson 8 in which you will be building a roleplaying text game!
To progress through the game, you will need to make use of every single lesson you have learned and try and win the game. First of all, in the previous lecture, we mentioned lists. Lists are known as a data structure. They can contain data. Simple as that.
Lists can contain a combination of data for example:
listPi = [‘python’, ‘java’, 22, 23]
listPy = [‘raspberry’, ‘pi’, a, b]
As mentioned before, a list always begins at location zero. In the above lists, python and raspberry are in the location zero.
If you wanted to print a part of the list you would do something like:
print listPi[0]
That will print the word python. We can use lists for while loops as shown in the last lecture and for using if statements on. We will use them in the final project for the introduction course.
You could also try printing like this to get each variable in the list on a new line:
print '\n'.join(listPi)
Defining Fucntions
Functions are important in coding when you want to recycle code often. In our role playing game, we will want to re-use the function that checks how many lives a player has. If a player has less than 1 life, we need to tell them it’s game over and then quit the application. This will have to be used after almost every input.
To define a function we use the word “def” in python.
Here is an example of how def might work.
def numberOfSweets():print ‘There are some sweets in a bag’;
listSweets = [‘sherbet lemon’, ‘refresher’,’drumstick’];
for sweets in listSweets:
print sweets numberOfSweets();
The above code is a function. That means that the code can be used multiple times by calling it, or asking for it to be run. If you’d like call the function, you just type the name of it and the brackets. The brackets are there in case you would like to take a variable from another function or part of the code and allow the function to use it. For example, if you would like to pass how many lives a player has each time you check to see if it is game over.
PythonPi: Lesson Six
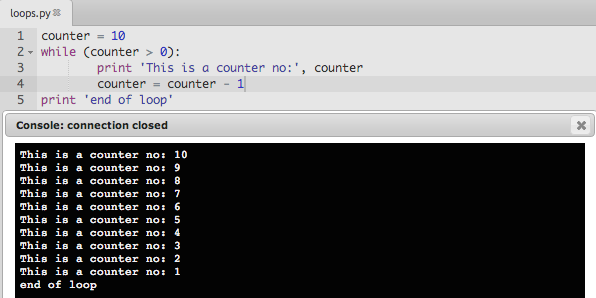
For this lesson we will be learning about various looping functions that python has to offer. A loop in a program is something that occurs whilst something meets a set of requirements. For example we might want to takeaway one number from another until it is down to zero, sort of like a counter. So for that we could write:
counter = 10
while (counter > 0):
print ‘This is a counter no:’, counter
counter = counter – 0
print ‘end of loop’
The above has a variable, counter set at the number 10. While the counter is greater than (the > sign) 0, the code below that is indented will run until the counter is no longer greater than zero. Following that, the program will print ‘end of loop’.
Below shows the output from the programming lab if you were to create this code:
A while loop will always loop whilst the condition is met. Therefore after 10 loops, it will no longer print out the counter number and will break from the loop. This is when the end of loop is printed. A while loop is useful for when you do not know how many times you will need to loop. If you do know how many times you will need to loop it would be better to use a for loop. If the condition never changed, for example we didn’t take away one from counter each time, the loop would go on forever. This is known as an infinite loop.
Lists:
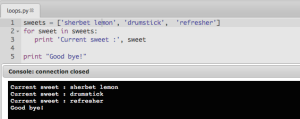
In Python, we can declare a list. A list can contain a multiple number of objects and these can then be used throughout programs, much like a collection of variables. We will go further into lists in lesson 7 however you must understand that a list is a collection of variables for the for loop example. The starting point of a list is always 0, therefore in the below code, sherbet lemon is in section 0 of the list. A 10 part list will go from 0-9.
For Loops:
The above code shows a for loop that will print the current sweet in a list until it gets to the end of the list. It will then say good bye. The code operates on a principle that for all the sweets in the list sweets, it will print out each sweet’s name as well as current sweet preceding it. For loops can be particularly useful when dealing with lists.
PythonPi: Lesson Five
In the last lesson we introduced you to logic. In this lesson we will be building you up towards a final assignment in which you use what you have learned throughout the introductory course to produce a game that uses input from a user to determine a result or an output.
Else-if statements are similar to if statements however they carry out multiple comparisons. We can use an else if statement for checking an input for a user. Consider a shopkeeper. A customer asks him if he has any bread. If he does have bread he will say yes. Else if he has no bread he will say no. This is an else if scenario.
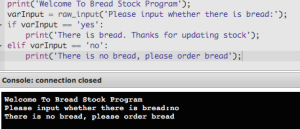
Lets us imagine that the shopkeeper checked his system, his system is a raspberry pi running python. His code would for his bread checking program would be as follows:
This is fairly useless as someone will always have to update the stock variable and therefore whoever did that will know weather it’s in stock but it’s a great metaphor for learning if statements. Notice the indentation, with Python, it’s awfully particular about indentation and won’t work unless the indentation is correct. In python instead of writing the words else if, we go with the much simpler ‘elif’.
Using an else if statement will allow us to print out something related to the original if statement however it will have a different comparison, usually based on the same variable or input.
Moving on from IDLE3:
So far in this course we have used IDLE3 to show you some simple tricks. From here on out, we will not be using IDLE3 to write our code as our code will start to become more complex, we will need to write programs in an editor. You obviously have access to the Virtual Programming Lab in Classroom however we would expect you to do most of this on your raspberry pi using a python editor.
Above we have use an else if to check if there is bread in stock. If there is no bread, the program politely asks the user to order some new bread. If there is bread in stock, the software thanks the user for updating the stock status. The varInput uses the input function of python to find out from the user. As you can see in the running program below the code, when the word no was typed, the code that ran was from the else if or elif section of the code and the print from yes was completely skipped over.
Hint: Python on your Raspberry Pi maybe version 3. Version three slightly differs from the version used in classroom. For input we use raw_input. Make sure you do this for your input for maximum grade in the lab.
PythonPi: Lesson Four
Today we are going to be learning about logic. Be sure to check you’ve submitted last weeks coursework to the classroom section of the PythonPi website.
To begin with, we will be introducing how a program runs. You may think that a program runs consistently and at all times, but what actually happens is the processor in your computer is only actually running one thing at a time. Each time it runs something it is known as a process. The process goes through many of your computers different sections before returning the result to the section it intended.
When you write a program on your Raspberry Pi, using the Python language, you must write each program in a set order. For example if you have the code:
print(“Python”);
print(“Raspberry Pi”);
The code will always print Python then Raspberry Pi. This is because programming happens in a way that is considered logical and in the sequence they are written. The computer will read the code in the sequence it is written.
Programming is considered a logical skill. We also use things known as operators in programming. They are also known as Logical Operators.
A logical operator can be any of many things. There is a guide to them here. The most common logical operators across any program language are:
- and – to check two things against each other for example if A and B are the same values as c and d
- or – to check if something matches to one thing or another for example to check if A is the same as B or C
- not – to check if something is not the same as something else. For example to check that A is not the same as B.
When coding we can use logical operators with functions. It is now time for you to be introduced to one of the most important concepts in coding. Statements. A statement is a comparing function that uses conditions to decide how to react.
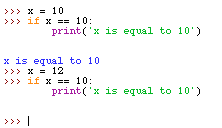
For the lab today, you will be required to write your first if statement. Something that is very common in programming languages across the board
The above will print only if the value x is actually equal to 10. If it is not. The program will not print anything. For example, if you typed into your IDLE3, x = 11 before typing the if statement, you would not see the printed result. This is the foundation of an if statement. An if statement will only process the next line of code if the conditions are met. This is shown above. If x is not actually equal to ten, then the next line won’t be processed.
Hint:
- When typing your if statement into the IDLE3 or Shell, use shift and enter keys on your keyboard in order to not process the code straight away and start a new line.
- When doing a comparison in an if statement we use two equals signs (==) instead of one. This tells the computer that you are comparing and not defining a variable to be an equals sign.
- When doing the practical, != is the operator for not equal to. For example, if a != 10 would check to see is a was not equal to 10.
PythonPi: Lesson Three
Well then, you’ve done your first programming lesson and now we are ready to introduce you to some further programming concepts. In this course we aim to teach you things as they come in useful. Today we are going to work with some of the ideas that programming allows.
One of the first things you must understand about computers is that they really don’t understand anything the way we do. Everything that happens on a computer is made up of electrical switches.
A programming language allows us to communicate with these switches in a more understandable way. In Lesson Two when you learned to print out Hello World you may have wondered what the point was? And why it took longer to print in a programming language than it did with a word processor. The reason for this is, when you tell a computer to print using Python, you are actually telling the computer to organise the switches in a way that outputs that word to the screen. It’s a lot more complicated than it seems.
Fortunately, you won’t have to understand what every switch does because Python understands for you. Using Python you can write code using logic and real words, which will be converted into computer talk. The only problem is, for Python to understand your words and logic, you must stick by some rules (The Syntax) to make sure the computer understands Pythons instructions.
Variables:
A variable is something that will be used in a program. A variable can be a number such as “10”, a string such as “Hello World” or a decimal number (known as a floating point) such as “15.0”.
To set a variable value in Python we use the “=” key. Equals allows us to set a variable to be something.
For example:
age = 12;
The above line of code will set up a variable called age with a value of 12. That means that if you printed age, it should show 12. Type the above line of code into your IDLE3 followed by the below line.
print(age);
notice how we don’t use quotation marks on a variable when printing. This is because we don’t want to print “age” but what it contains. You should see the number 12 displayed instead of the word age.
Now we are going to try using string variables. Set up a variable that contains your name. For example, I might put:
name = “PythonMan”;
Now print out your name followed by the age. You can do this using a comma to separate variables within the print brackets.
print(name, age);
The result I would get is “PythonMan 12” because that is the age and name I had given to the variables.
PythonPi: Lesson Two
Now then, you’ve got your Raspberry Pi up and running with Raspbian, fortunately for you, that’s the installing pretty much done for now. We can delve straight into having some fun with Python because the language is actually pre-installed because it is the official language of the Raspberry PI. Great, let’s get started with Python then.
Python is a programming language. Programming languages are how we communicate with computers. Tell them what to do. In the olden days people used to use punch cards, individually punching through long pieces of card then feeding them into a slot in the computer. Now it’s a lot less painful than that. In fact you can make a program pretty easy just by knowing a few simple rules. These rules are known as Syntax, however we won’t try and use to many technical words this early on in the course.
On your Raspberry Pi, open up the Python IDLE3 from the programming section of the program menu.
This will present you with something known as the shell. From here we can type commands to the computer and make it do as we please.
Our first program is going to be learning how to tell the computer to print or display a set of words on the screen.
Type into the window:
3 + 6
and then press the enter button. You should get the result:
9
If you did, great! You’ve just written your first ever Python command. Maths functions like the ones on a calculator are really easy using Python.
The next part of this lesson will involve words. In computer programming languages, we call a set of words that are bundled together, like a sentence, a “string”.
Let’s print out a string on the Python Shell.
Type:
print(“Hello, World!”);
Then press the enter key and you should see the text “Hello, World!” without the quote marks or the text surrounding the string.
That was called a print function and it’s very handy for making text applications and finding problems in your code.
PythonPi: Lesson One
Hello and Welcome to Python Pi. This is a series of lessons that will teach you how to set up your Raspberry Pi so that it is ready for the future lessons in this course. Here we will delve into the exciting world of Raspberry Pi, learning how to program, offering tips and tutorials on various features of the Raspberry Pi and trying to have some fun along the way!
Requirements:
- Raspberry Pi
- Screen + HDMI
- SD Card
- USB Power cord
- USB Keyboard & Mouse
In order to set up your Raspberry Pi, you are either going to need the pre-installed operating system on an SD Card or to install it yourself. An operating system is a computing environment. You know when you boot your computer up at home and it sometimes shows either an Apple or a Window whilst it waits to load? This is the same sort of thing, except specifically for Raspberry Pi and it’s free! To install an operating system on your Raspberry Pi, you need to download NOOBS. This is an acronym for New Out Of Box Software. This will allow you to install an Operating System. For this course we require you to use Raspbian.
To start your Raspberry Pi make sure you have connected all the cables in the correct sports
If you head to the Class Room you can fill in a quiz on this first post.

Recent Comments